A marvel of engineering and design, the Mavic Air was built to go wherever adventure takes you. Inheriting the best of the Mavic series, this ultraportable and foldable drone features high-end flight performance and functionality for limitless exploration. The Mavic Air is the most portable DJI drone to house a 3-axis mechanical gimbal, with its angular vibration range reduced to 0.005°. Set in a triangular formation, gimbal dampeners help create even steadier shots. Best of all the Mavic Air shoots video at an incredible 4K 30 fps, recording at 100 Mbps to capture every second with UHD quality.
It is a wonderful idea to input the DJI Mavic Air captured 4K footage into Adobe After Effects for further editing. However, it will be CPU comsuming if you load DJI Mavic Air 4k into After Effect and try to render the final file. If you say you have owned a very power computer and can get this job done, okey, how about the final render file? It can be very easy to say that its size will be very very large after adding vdieo effects to it. So today what we are gonna discuss is how to compress DJI Mavic Air 4k to 1080p for better postproduction, and compress the large render files for better sharing.
Part 1. How to Compress DJI Mavic Air 4K to 1080p before After Effects Editing
To compress DJI Mavic Air captured 4k footage before inputting into After Effects, you have a good choice - finding a smart assistant which comes as a super compressor. Pavtube Video Converter Ultimate always stands out from it competitors will never let you down. It allows you to input 4K MOV, 4K MP4, 4K AVCHD, 4K MKV and output MKV, MOV, MP4, AVI, M4V etc with 4K/2K/SD/HD resolution, moreover, customizing video parameters like video/audio codec, resoluiton, bit rate, frame rate, channels etc are available here. Apart from video rosolution, video file size also depends on video bit rate, get smaller video size by lowering the bit rate.
Quick Guide to Compress DJI Mavic Air 4K to 1080p before After Effects Editing
Step 1: Load DJI Mavic Air 4K video into the program.
Start the program on your computer, click "File" menu and select "Add Video/Audio" or "Add from folder" to import DJI Mavic Air 4K video.

Step 2: Define output video format
Click "Format" bar, from its drop-down options, choose the best compatible uploading format from "Common VIdeo" > "H.264 High Profile Video(*.mp4)". You also can choose other video formats according to your needs.

Step 3: Compress DJI Mavic Air 4K to 1080p
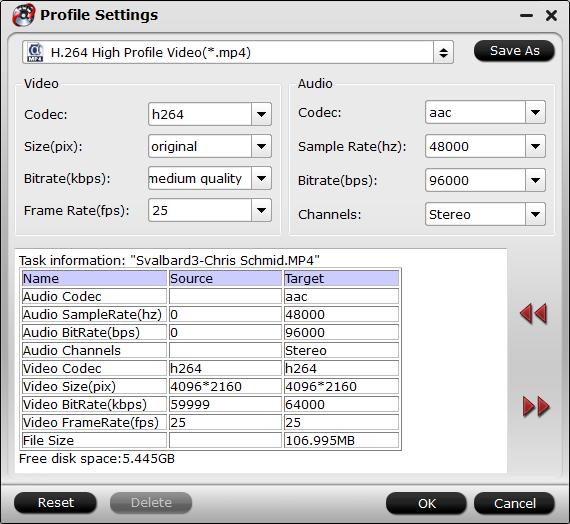
Hit "Settings" to open the "Profile Settings" window, here you can adjust the output video codec, resolution, bit rate, frame rate and audio codec, bit rate, sample rate and channels. To compress 4k to 1080p, just type 1920*1080 in Size blank. If you prefer smaller video size, lower the video bit rate can help you achieve this goal.
Step 5: Start the conversion.
Start to compress DJI Mavic Air 4K video to 1080p conversion by hitting the right bottom convert button, when the conversion is over, you will have no limitation to upload DJI Mavic Air 4K video to After Effects. You will be surprise about the smooth editing process.
Part 2. How to Compress After Effects render file size for sharing
Above is the tutorials to help you compress the DJI Mavic Air 4k to 1080p for smooth editing. Almost all After Effects moive making lovers know that, although the file you input into Adobe AE is very small, the render file will be larger larger larger than what you input, cause you have done the footage's postproduction. So how to reduce the render file size? Here are two ways to help you solve the problems.
Method 1. How to reduce the render file size in Affter Effects
To reduce render file size in Affter Effects is to change the format to H.264, but how? Keep reading.
To render H.264 it's actually very easy.
- From your Project window, select the sequence you wish to render.
- Right click->Export Media (or File->Export Media)
- In the Video tab, select H.264 for format
Then, in the basic video settings below, you can change to smaller-than-original resolution, low bit rates, etc.
Method 2. How to reduce the Affter Effects render file size via Pavtube tool
If you are not faniliar with the operation by reducing in After Effects, this method will be very easy for you. Open Pavtube Video Converter Ultimate and load the render file into it, then define the output format you like just like we just do above, then click Settings on the UI, screenshot like below.
Now you are able to adjust the output video codec, resolution, bit rate, frame rate and audio codec, bit rate, sample rate and channels. Apart from changing video resolution, you also can lower the bit rate to make the render file smaller.
Up to now, you may have no trouble to play the DJI Mavic Air 4k with any devices, or upload to Youtube Facebook, Twitter for sharing with thousands of net friends.
Related Articles
Hot Articles & Reviews
- Best Spark Video Converter for Mac: Encode Spark Videos
- Top 8 iMovie Converter for Mac
- Best Editing Workflow of 4K H.265 with Final Cut Pro 7/X
- Play 4K video on Edal 2017 the Latest Aluminum 4K Android 6.0 TV Box
- Convert DJI Phantom 4 4K Recording To Play On IPad/WMP/VLC, Edit On FCP/IMovie/WMK And Upload To YouTube/Vimeo/FaceBook
Any Product-related questions?support@pavtube.com